
Snapshots & Versions
Snapshots let you save point-in-time copies of your chapters, so you can always go back.
Taking a Snapshot
Section titled “Taking a Snapshot”There are two ways snapshots get created:
- Automatic — Writefully So quietly saves snapshots as you write (throttled to avoid clutter, and skipped entirely when the chapter hasn’t changed since the last one)
- Manual — Press
Cmd/Ctrl + Shift + Sor click Save in the snapshot panel to create one on demand
Manual snapshots let you add an optional label (e.g., “Before restructure” or “Draft 2 complete”).
The Snapshot Panel
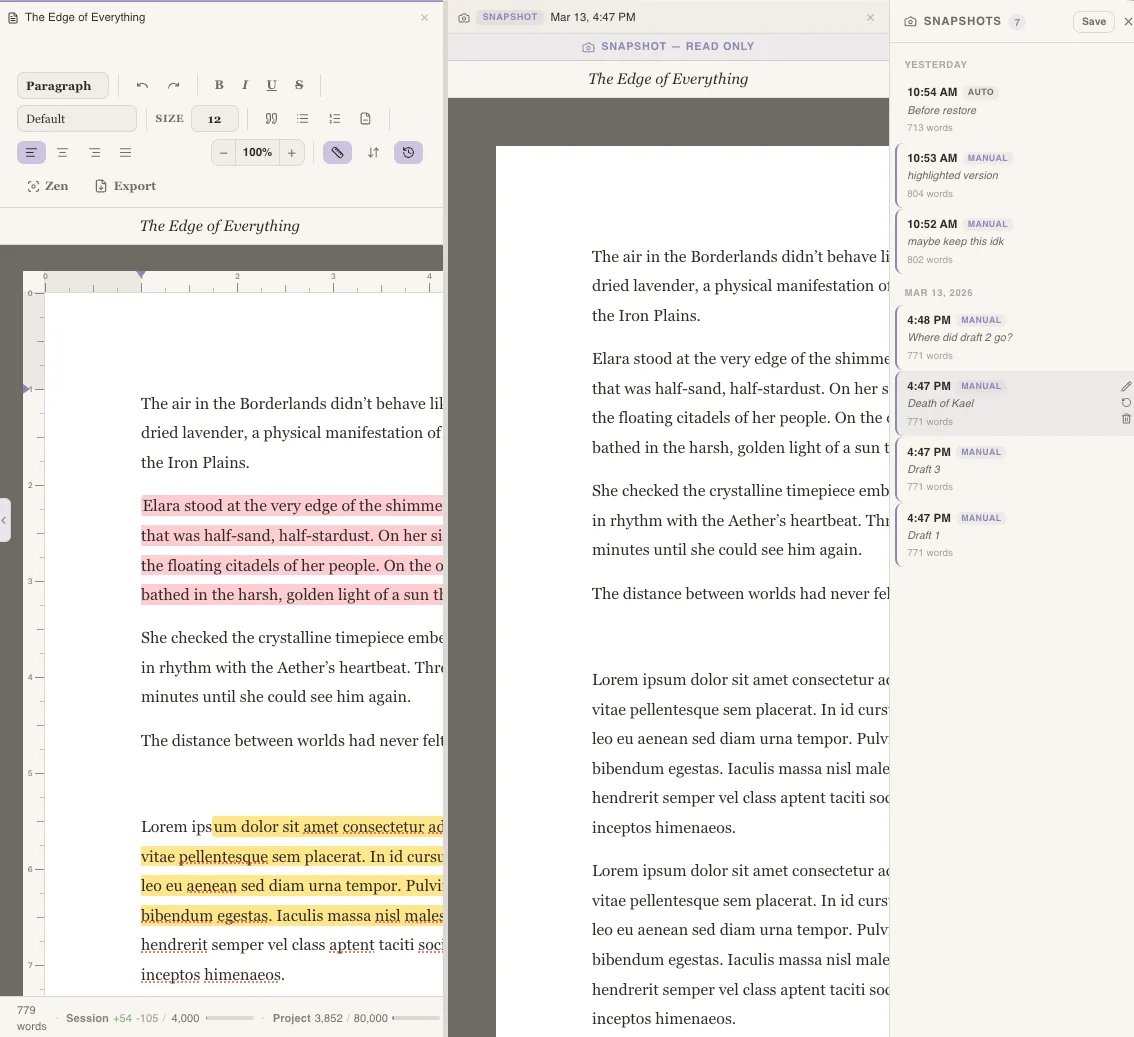
Section titled “The Snapshot Panel”Open the snapshot panel from the toolbar’s history icon. You’ll see all snapshots grouped by date:
- Time — when the snapshot was taken
- Type badge — “Manual” (accent-colored) or “Auto”
- Word count — how many words the chapter had at that point
- Label — your custom label, if you added one
Previewing a Snapshot
Section titled “Previewing a Snapshot”Click any snapshot to preview it in a read-only split pane. The preview shows:
- A “Snapshot — Read Only” banner at the top so you know you’re looking at a saved version, not your live chapter
- A Snapshot badge in the split pane tab with the date and time
- The full chapter content as it was when the snapshot was taken
- No toolbar, rulers, or status bar — just clean reading
This lets you compare the snapshot side-by-side with your current chapter without any risk of accidentally editing the old version.
Comparing Two Versions
Section titled “Comparing Two Versions”To see exactly what changed between drafts, hover a snapshot and click the compare icon (two crossing arrows). The comparison opens over the editor and never touches your manuscript.
- Pick which two versions to read with the Earlier and Later dropdowns. Either side can be Current draft, so you can compare a snapshot against what you have now, or two snapshots against each other.
- Switch between Inline — one column with added and removed wording highlighted in place — and Side by side, which is easier for larger rewrites.
- The summary bar counts changed passages and added/removed words, and the up/down arrows jump straight to the next change.
- The Versions rail on the left lists every snapshot plus the current draft, so you can move through the chapter’s history without closing the comparison.
Press Esc to close the comparison and return to writing.
Restoring a Snapshot
Section titled “Restoring a Snapshot”To restore a snapshot (replace your current chapter with the saved version):
- Hover over a snapshot in the panel
- Click the restore button (circular arrow)
- Click again to confirm
Before restoring, Writefully So automatically saves a snapshot of your current content labeled “Before restore” — so you can always undo the restore if you change your mind.
Labeling Snapshots
Section titled “Labeling Snapshots”Hover over any snapshot and click the pencil icon to add or edit a label. Good labels make it easy to find important versions later:
- “First draft complete”
- “Before cutting chapter 3”
- “Editor feedback incorporated”
Deleting Snapshots
Section titled “Deleting Snapshots”Hover over a snapshot and click the trash icon, then confirm Move to Trash. The snapshot leaves the history but isn’t gone: it moves to the project Trash in the binder, alongside any deleted chapters, characters, maps, timelines and codex entries.
From the Trash you can restore the snapshot back into the chapter’s history, or delete it forever. Emptying the Trash removes trashed snapshots permanently too.
When to Use Snapshots
Section titled “When to Use Snapshots”- Before major edits — save a snapshot before you restructure or rewrite a chapter
- At milestones — snapshot at the end of each draft
- Before experiments — try a risky rewrite knowing you can always go back
- Before sharing — lock in your version before sending to a beta reader
- Name your snapshots descriptively — your future self will thank you
- Snapshots are stored locally as part of your project database — they don’t take up much space
- Combine snapshots with regular file backups for a robust safety net
- Use compare to see precisely what moved between drafts; use the preview when you just want to read an old version